Hi,
The latest "Upload HOST Firmware Version 2.x.x (Fall 2016)" is successfully uploaded to the dongle (Host).
Now, what should be my next steps? Should I go for Upload device ? If so , do I need no solder any part ?
I meant to say : 1) uploading of dongle successfull.
2) ????
If both RFduinos have the correct firmware, you should be able to use the GUI Radio Configuration panel to do these operations:
Status
Get Channel
Change Channel
Autoscan
Or, if something is failing, "Override Dongle".
All of those operations run in the RFduinos, the main processor, chipKIT, is not involved. In order to upload the chipKIT, your two RFduinos must be communicating (dongle and mainboard RFduinos).
You told "your two RFduinos must be communicating (dongle and mainboard RFduinos)".
According to you, "Upload HOST Firmware Version 2.x.x (Fall 2016)" is successfully uploaded to the dongle (Host).
Now should I go for Upload "Upload DEVICE Radio Firmware Version 2.x.x (Fall 2016)" ?
For this I need to solder dongle ?
Are you working with a professor and other grad students at your university? Anyone else there using OpenBCI? I suggest networking with some other OpenBCI users for tips and better understanding.
re: "I got Success".
If your Autoscan said success, that means that both RFduinos are now talking to each other. What does Status say? It sounds like both are on radio channel 9. DO NOT use Host Override. Autoscan had success.
re: "now should I go for upload..." NO NO NO
The RFduinos are now in good shape. DO NOT reload the dongle firmware. DO NOT reload the mainboard RFduino firmware. You got 'success' on the Autoscan. Meaning that the radio communications is now in good shape.
re: "for this I need to solder dongle" NO NO NO NO PLEASE follow the instruction links I gave earlier. The only thing remaining for you to do now, is to reload the chipKIT with 'defaultboard' default firmware.
Then was showing cyton dongle could not connect to the board. Then again I tried autoscan and after various try, I got agian: Sucess Host override. Channel no 20.
Before was channel 9....
confused....
Again Autoscan... error
Get channel: Error host channel 20
Autoscan : Sucess Host override. Channel no 20.
Status: cyton dongle could not connect to the board.
If Autoscan says 'success', then proceed with the 'defaultboard' upload using your Arduino IDE. Ignore the Status result, as it is trying to connect to 'defaultboard' to get the firmware version. Since your chipKIT is NOT running 'defaultboard' firmware, that fails. The Autoscan may choose different radio channel numbers when it is run. This is ok, as long as it says success.
Are you working with a professor and other grad students at your university? Anyone else there using OpenBCI? I suggest networking with some other OpenBCI users for tips and better understanding.
My luck is too bad. I know I am bothering you a lot.
On the GUI. Autoscan success with various channel.
Then install Arduino1.8.10 and follwed. On uploading default board, no target found and Led is blinking continuously.
yes. Cyton Off. Then pressing both together. Then switching to pc mode. Then releasing rst ( led starts to blink) and after that releasing prg. Led blinks. Then uploading.
Yes, COM 1
showing on device manager and on IDE.
Does the blue led blink, as mentioned, after the Cyton is placed in boot mode? When you start the upload from the IDE, do you see lights on the dongle flashing, etc.?
oes the blue led blink, as mentioned, after the Cyton is placed in boot mode? YES
When you start the upload from the IDE, do you see lights on the dongle flashing, etc.?YES
I have updated GUI to v4.16 .
When pressing Auto, it is showing " Otherwise cyton firmware is out of date.
Finally .....................
It is showing program flash done. Veryfy flash done.
Please do a favour. I am very afraid. Previously I used GUI 4.12
Now, there is another GUI 4.16. Which one I should use ?
Asking a silly question: How to start to measure EEG ? Please don't be annoyed. I have no one to help except you.
re: "When pressing Auto, it is showing 'Otherwise cyton firmware is out of date.' "
Did you try 'Manual' instead of 'Auto' Serial Connect? Select the COM port that appears / disappears when you plug / unplug the dongle. The Auto mode may be getting confused with other COM ports you have.
re: GUI version
Use either one. The 4.1.6 should be fine and contains latest enhancements and bug fixes.
Hi, These are the steps by which I could get success ...
The error : 1. No target found.
Beim Hochladen des Sketches ist ein Fehler aufgetreten
Programmer for Microchip PIC32 microcontrollers, Version 2.1.24
Copyright: (C) 2011-2015 Serge Vakulenko
Steps I took
1. https://docs.openbci.com/docs/02Cyton/CytonRadios#uploading-host-firmware-to-the-openbci-dongle
2. https://docs.openbci.com/docs/02Cyton/CytonProgram
Followed each line carefully. Specially this paragraph which I ignored all the previous attempts. [Note for Windows users While installing Arduino 1.8, if the installer instructs you to uninstall 1.5.8, move the Arduino folder containing 1.5.8 from Program Files to your desktop or another folder. Rename this folder to Arduino_1.5.8. Open the Change or remove program app in control panel and uninstall the Arduino application. There will be a popup indicating that the files do not exist and asking if you want to remove the program from the files list, select yes. Then install 1.8.0 as normal. Navigate to back to your Program Files folder and locate the Arduino folder. Rename this folder to Arduino_1.8.0. Now drag and drop the Arduino_1.5.8 back into Program Files folder.]
3. Here also at first found “ No target device found”.

Comments
Hi,
The latest "Upload HOST Firmware Version 2.x.x (Fall 2016)" is successfully uploaded to the dongle (Host).
Now, what should be my next steps? Should I go for Upload device ? If so , do I need no solder any part ?
I meant to say : 1) uploading of dongle successfull.
2) ????
Yes , COM port shows with other laptop.
If both RFduinos have the correct firmware, you should be able to use the GUI Radio Configuration panel to do these operations:
Or, if something is failing, "Override Dongle".
All of those operations run in the RFduinos, the main processor, chipKIT, is not involved. In order to upload the chipKIT, your two RFduinos must be communicating (dongle and mainboard RFduinos).
How can I be sure both RFduinos have the correct firmware.
If both RFduinos have the correct firmware, you should be able to use the GUI Radio Configuration panel to do these operations...
Did you try the operations mentioned?
After
*Status
*Get Channel
*Change Channel
*Autoscan
I got Success. Host override. Channel no 9. On the GUI.
It means what ?
You told "your two RFduinos must be communicating (dongle and mainboard RFduinos)".
According to you, "Upload HOST Firmware Version 2.x.x (Fall 2016)" is successfully uploaded to the dongle (Host).
Now should I go for Upload "Upload DEVICE Radio Firmware Version 2.x.x (Fall 2016)" ?
For this I need to solder dongle ?
Are you working with a professor and other grad students at your university? Anyone else there using OpenBCI? I suggest networking with some other OpenBCI users for tips and better understanding.
re: "I got Success".
If your Autoscan said success, that means that both RFduinos are now talking to each other. What does Status say? It sounds like both are on radio channel 9. DO NOT use Host Override. Autoscan had success.
re: "now should I go for upload..." NO NO NO
The RFduinos are now in good shape. DO NOT reload the dongle firmware. DO NOT reload the mainboard RFduino firmware. You got 'success' on the Autoscan. Meaning that the radio communications is now in good shape.
re: "for this I need to solder dongle" NO NO NO NO PLEASE follow the instruction links I gave earlier. The only thing remaining for you to do now, is to reload the chipKIT with 'defaultboard' default firmware.
Then was showing cyton dongle could not connect to the board. Then again I tried autoscan and after various try, I got agian: Sucess Host override. Channel no 20.
Before was channel 9....
confused....
But if I click status , again "*showing cyton dongle could not connect to the board.Perhaps they are on different channel**
Again Autoscan... error
Get channel: Error host channel 20
Autoscan : Sucess Host override. Channel no 20.
Status: cyton dongle could not connect to the board.
If Autoscan says 'success', then proceed with the 'defaultboard' upload using your Arduino IDE. Ignore the Status result, as it is trying to connect to 'defaultboard' to get the firmware version. Since your chipKIT is NOT running 'defaultboard' firmware, that fails. The Autoscan may choose different radio channel numbers when it is run. This is ok, as long as it says success.
https://docs.openbci.com/docs/02Cyton/CytonProgram
Are you working with a professor and other grad students at your university? Anyone else there using OpenBCI? I suggest networking with some other OpenBCI users for tips and better understanding.
Yes , I am working with a professor but there is no other student in my university who is working with openBCI.
My luck is too bad. I know I am bothering you a lot.
On the GUI. Autoscan success with various channel.
Then install Arduino1.8.10 and follwed. On uploading default board, no target found and Led is blinking continuously.
Are you sure you are putting the Cyton chipKIT into boot mode? You have to press the switches in exactly the right sequence.
https://docs.openbci.com/docs/02Cyton/CytonProgram#put-cyton-in-bootloaded-mode
Is the COM port appearing ok in Device Manager? Is the Arduino IDE showing the COM port? Etc.
yes. Cyton Off. Then pressing both together. Then switching to pc mode. Then releasing rst ( led starts to blink) and after that releasing prg. Led blinks. Then uploading.
Yes, COM 1
showing on device manager and on IDE.
Perhaps you have something odd with this laptop. Can you try on another, maybe even on a Mac.
Does the blue led blink, as mentioned, after the Cyton is placed in boot mode? When you start the upload from the IDE, do you see lights on the dongle flashing, etc.?
https://www.google.com/search?as_q=firmware+no+target+found&as_sitesearch=openbci.com
oes the blue led blink, as mentioned, after the Cyton is placed in boot mode? YES
When you start the upload from the IDE, do you see lights on the dongle flashing, etc.?YES
I have updated GUI to v4.16 .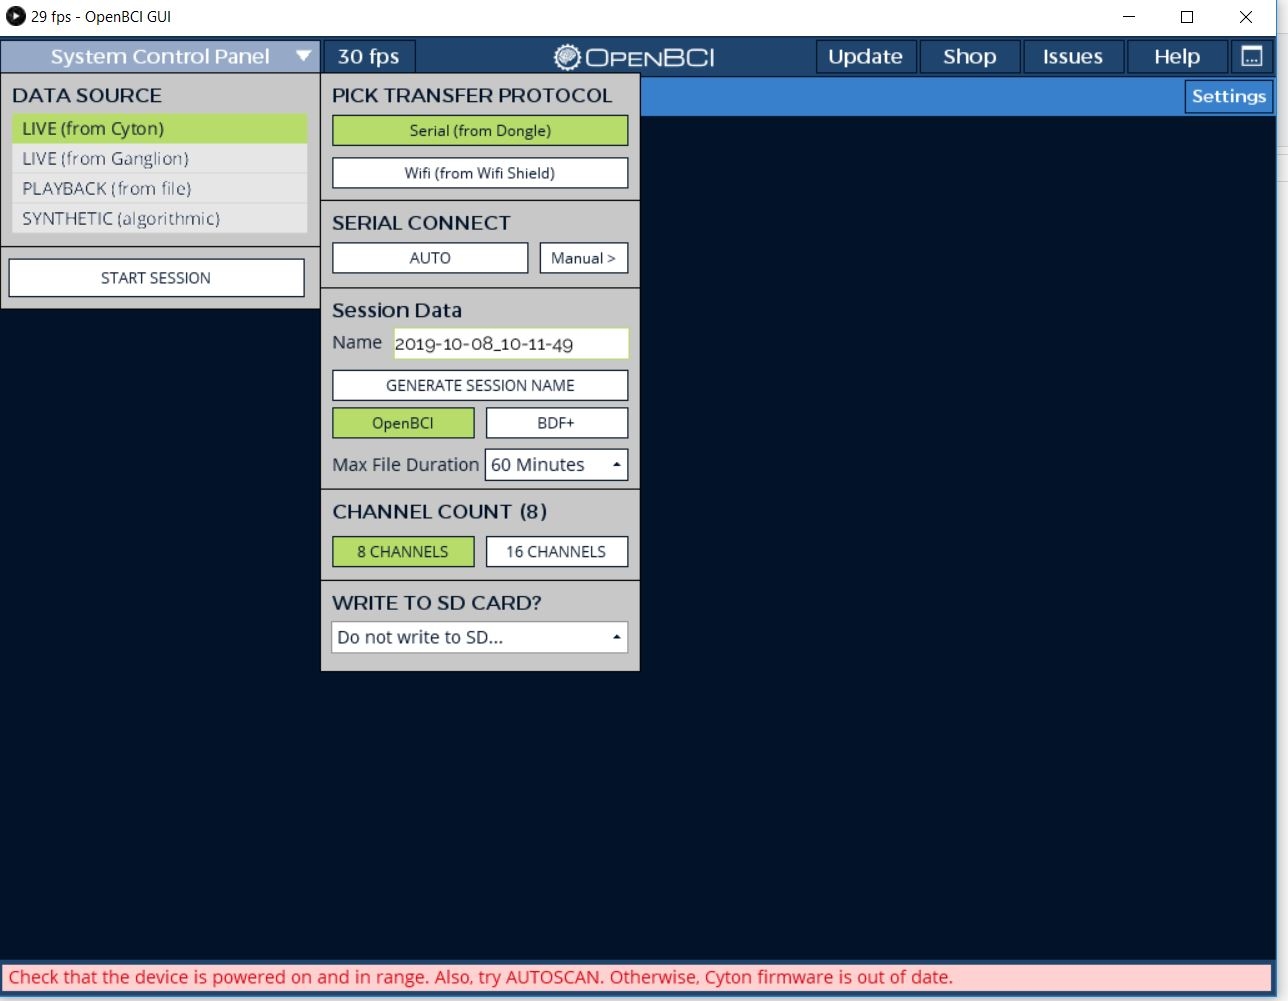
When pressing Auto, it is showing " Otherwise cyton firmware is out of date.
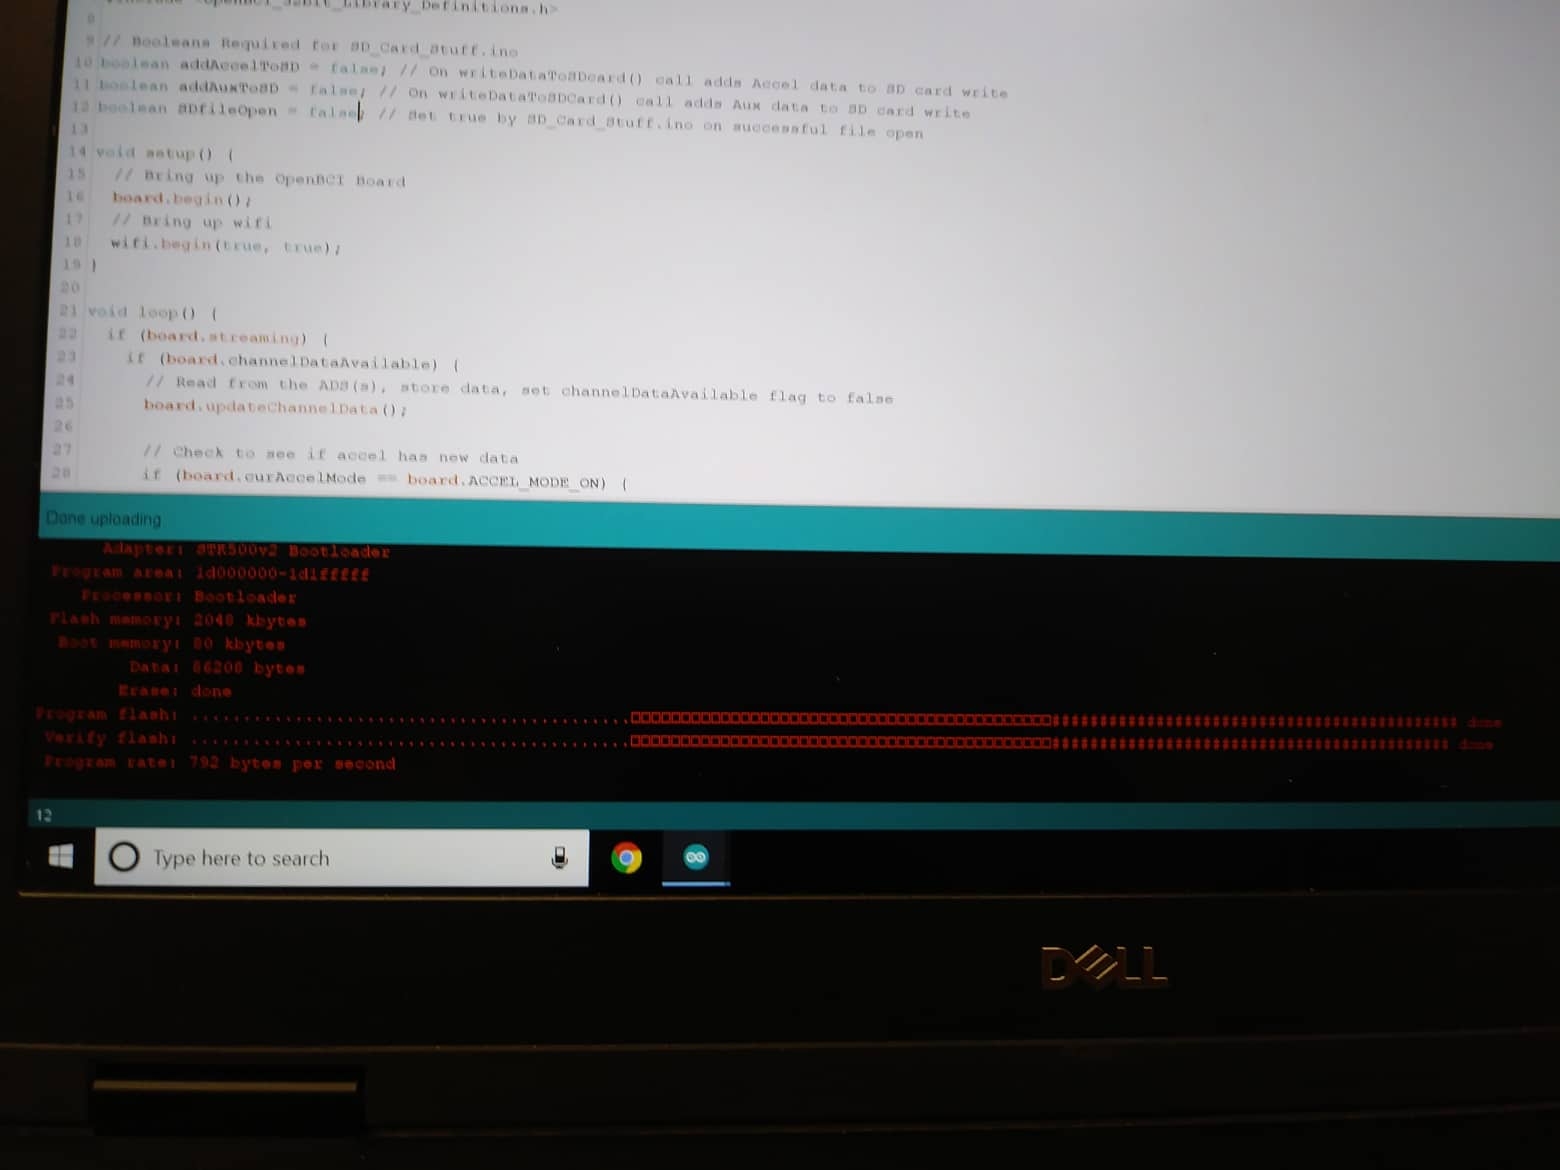
Finally .....................
It is showing program flash done. Veryfy flash done.
Please do a favour. I am very afraid. Previously I used GUI 4.12
Now, there is another GUI 4.16. Which one I should use ?
Asking a silly question: How to start to measure EEG ? Please don't be annoyed. I have no one to help except you.

re: "When pressing Auto, it is showing 'Otherwise cyton firmware is out of date.' "
Did you try 'Manual' instead of 'Auto' Serial Connect? Select the COM port that appears / disappears when you plug / unplug the dongle. The Auto mode may be getting confused with other COM ports you have.
re: GUI version
Use either one. The 4.1.6 should be fine and contains latest enhancements and bug fixes.
Hi, These are the steps by which I could get success ...
The error : 1. No target found.
Beim Hochladen des Sketches ist ein Fehler aufgetreten
Programmer for Microchip PIC32 microcontrollers, Version 2.1.24
Copyright: (C) 2011-2015 Serge Vakulenko
Steps I took
1. https://docs.openbci.com/docs/02Cyton/CytonRadios#uploading-host-firmware-to-the-openbci-dongle
2. https://docs.openbci.com/docs/02Cyton/CytonProgram
Followed each line carefully. Specially this paragraph which I ignored all the previous attempts. [Note for Windows users While installing Arduino 1.8, if the installer instructs you to uninstall 1.5.8, move the Arduino folder containing 1.5.8 from Program Files to your desktop or another folder. Rename this folder to Arduino_1.5.8. Open the Change or remove program app in control panel and uninstall the Arduino application. There will be a popup indicating that the files do not exist and asking if you want to remove the program from the files list, select yes. Then install 1.8.0 as normal. Navigate to back to your Program Files folder and locate the Arduino folder. Rename this folder to Arduino_1.8.0. Now drag and drop the Arduino_1.5.8 back into Program Files folder.]
3. Here also at first found “ No target device found”.
4. Again run step-2 and got success.