
There are currently more than 1 billion people worldwide who are disabled, and from that, 15 million individuals are paralysed. Paralyzed individuals are often told they may never regain mobility, and with no new innovative solutions, they are left unable to do even the simplest tasks, such as walking, making them reliant on caregivers.
Paralysis comes in different forms, listed below:
- Monoplegia – Affects one arm or leg
- Hemiplegia – Affects one side of the body, including an arm and a leg
- Paraplegia – Affects both legs
- Quadriplegia – Affects both arms and legs
BCI Exoskeleton is a prosthetic system designed to improve the lives of individuals with limb loss and those with limited motor functions, such as those affected by conditions like cerebral palsy or muscular dystrophy.
1. What are you making?
I’m developing a brain-controlled exoskeleton arm designed to help people who have difficulty moving their arms, such as individuals with paralysis, regain control over their movements. This device works by using a headset that detects brain signals, which are then processed and translated into specific actions for the exoskeleton. Essentially, the person thinks about moving their arm, and the exoskeleton interprets these thoughts, activating motors and joints in the arm to mimic natural movement.
The exoskeleton isn’t a permanent replacement for an arm but acts as an assistive device, offering support and helping the user perform everyday tasks more independently—like picking up a glass of water or holding a pen. My goal is to make this technology more affordable, durable, and easy to use compared to existing options, which are often costly and less accessible. By creating a more adaptable exoskeleton, I hope to give people the freedom to regain mobility in their arms without needing extensive surgeries or expensive equipment, empowering them to lead more active, independent lives.
2. How are OpenBCI tools being applied?
The technology provided by OpenBCI will be utilized in monitoring brain signals, which will later be used to send controls to the exoskeleton. By using the Biosensing Bundle, I can take on this project in multiple ways, since I have different types of hardware and software tools. Below, I wrote the use applications of every item provided by OpenBCI.
Cyton + Daisy Biosensing Board
- Since this board can read up to 16 channels, I will use the following channels to detect movement-related potentials (MRPs): F3, F4, C3, C4, P3, P4, O1, O2, T3, T4, Fp1, and Fp2.
- This board also provides really high-resolution brainwave signals, which allows me to conduct a detailed analysis of the electrical activity in different brain regions to maximize accuracy when connected with the Mark IV EEG Headset.
Ultracortex Mark IV EEG Headset
- This headset is compatible with the Cyton + Daisy Biosensing Board, which provides 16-channel high-quality brain signal readings.
- Flexibility in sizes and an increase in comfort will support users who may be unfamiliar with EEG technology.
- I am choosing the preassembled version as I don’t have access to a 3D printer, and this will ensure the headset is correctly assembled. Furthermore, it allows me to spend more time on the construction of the project as a whole.
EEG Headband Kit:
- I would use this kit when setting up the whole headset, which would be impractical; this would increase my overall efficiency towards the completion of the project.
- The small, flexible design also makes it easier to apply in situations where a full headset could be cumbersome, like during initial trials or prototyping.
Gold Cup Electrodes:
- These electrodes will be used in conjunction with the EEG headset to ensure high-quality contact with the scalp for accurate EEG readings. They are critical for minimizing noise, thus improving signal clarity.
EMG/ECG Snap Gel Electrodes + Pack:
- These electrodes will be used to monitor muscle activity (EMG) and heart signals (ECG). EMG data can help correlate physical movements with brain activity, while ECG data can provide insights into the user’s emotional state.
Dry EEG Comb Electrode:
- Increases the convenience of use to collect data
- May improve data collection efficiency, making it easier to gather data in various settings, including outdoor experiments or public demonstrations.
Pulse Sensor (Heart-Rate Monitor):
- Monitoring the heart rate in the project can be correlated with brain activity to see how emotional states and physical exertion may affect brain signals.
3. Why is this important?
This project is important because it addresses a real need for people who have lost arm mobility or strength, helping them regain independence in their daily lives. By creating an exoskeleton arm that can be controlled through brain signals, I’m making a project as an extension of the body, allowing people to move and interact with their environment just by thinking.
4. Who is involved in this project?
Currently, the project consists of me, although I plan to work with others during the project as well. If you guys want to work together, reach out to me!
5. Want to learn more about this project?
To learn more about this project, you can visit my LinkedIn or Medium page for constant updates on the project. I post regular updates on the project, every other month, and you can also reach out to my LinkedIn if you have any questions!
LinkedIn: https://www.linkedin.com/in/aarav-sharma-/
Medium: https://medium.com/@aaravsharma23
Email: [email protected]
_________________________________________________________________________________________
The following section is a tutorial on replicating my project created from May in 2025 onwards
Through the next section, I will walk through a complete tutorial for creating a brain-controlled exoskeleton arm with two degrees of motion. I will first explain the Brain-Computer Interface (BCI) side of the system.
In this prototype, the system works by classifying whether the user is in a more focused or relaxed state. Based on this detected state, a signal is sent from the BCI setup to the arm control system, which then performs a movement. For this version, a focused state can be used to close the arm, while a relaxed or non-focused state can be used to open it.
To simplify the setup, this tutorial uses the focus widget already available in the OpenBCI GUI. Instead of directly extracting the EEG focus value from the backend, the current system reads the color shown by the focus widget on the screen. This makes the method easier to prototype, although it is still a workaround rather than a fully integrated signal-processing pipeline. However, if you wish to extract the EEG focus values within the programming phase, you can utilize the Brain Flow library, which has very useful functions that do these calculations automatically.
Please find the code for this setup in the attached GitHub repository under the file named “state_detector.py”. This file uses a Python library called tkinter, which can detect the HEX color value at a selected screen location. Since the OpenBCI focus widget changes color depending on the detected state, the script places the cursor over that widget and continuously reads the color being displayed. In this setup, the widget uses blue and green, with the respective HEX codes #3f67a0 and #c0db79. By tracking which color is currently shown, the program can determine whether the user is detected as focused or relaxed.
Please refer to the image below for the OpenBCI GUI focus widget.
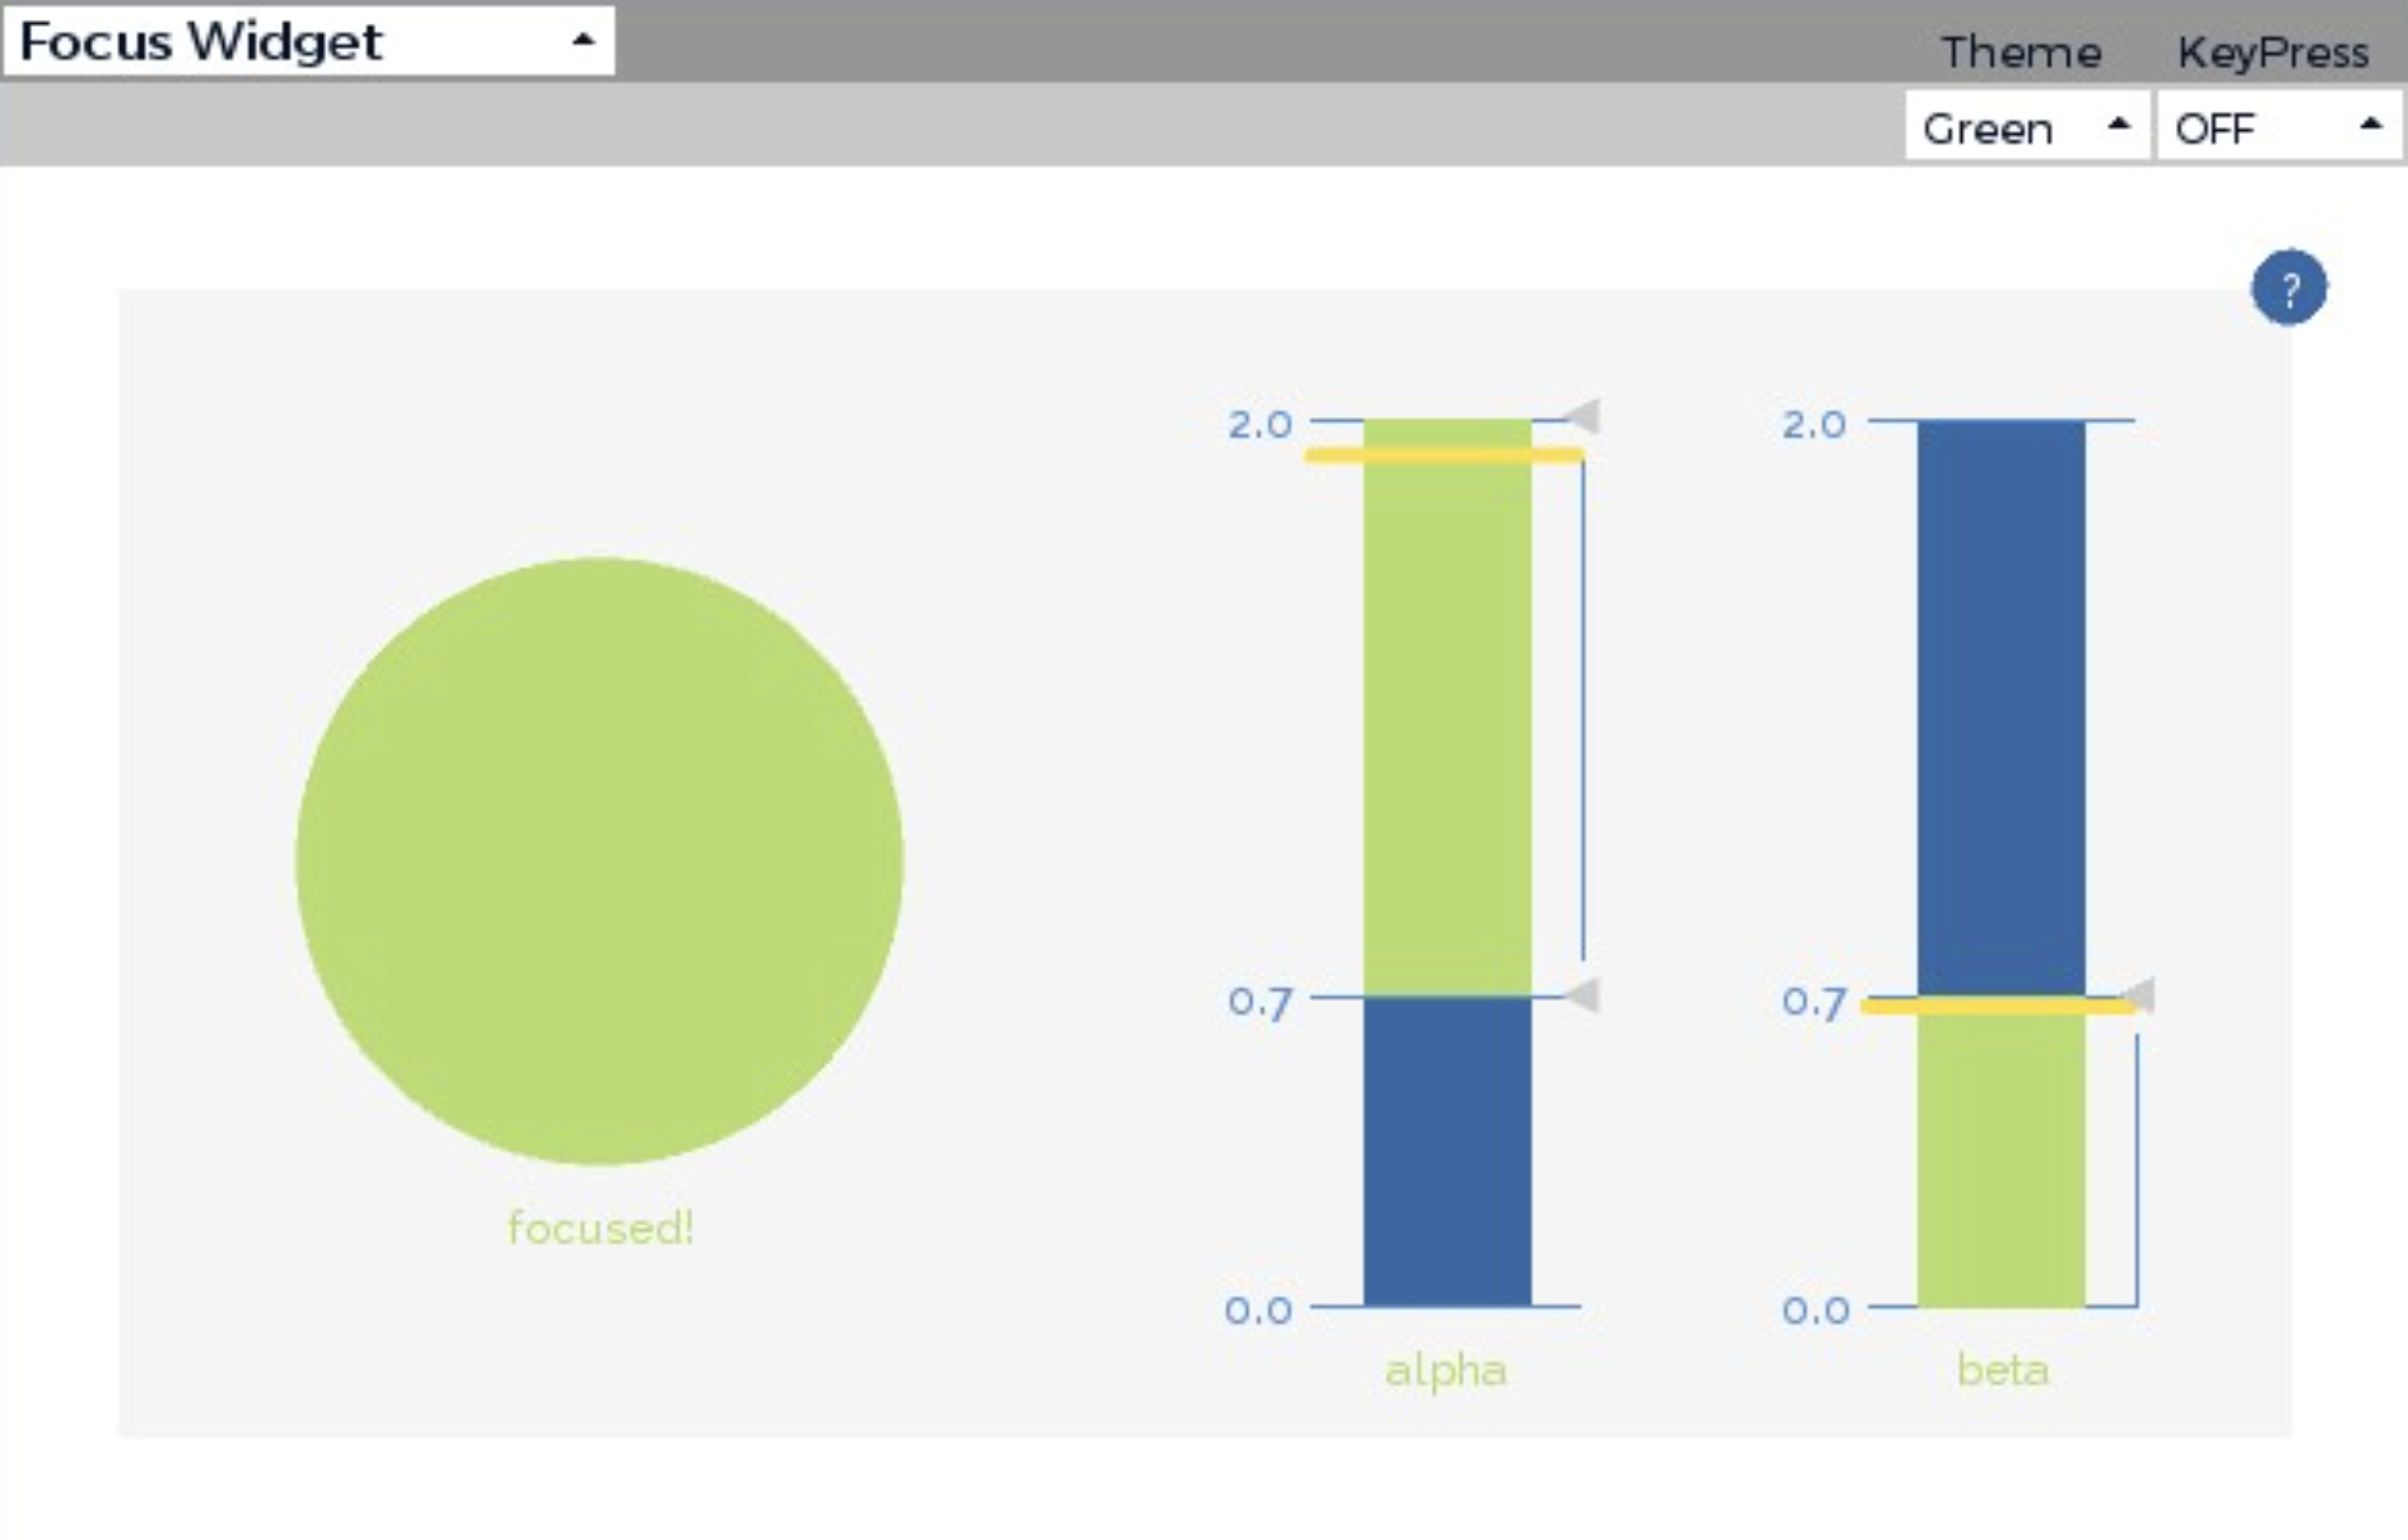
A quick note: the focus feature in OpenBCI is based on EEG activity, commonly using relationships between alpha and beta brainwave bands. In general, higher beta activity relative to alpha is more often associated with concentration or alert focus, while higher alpha activity relative to beta is more often associated with a more relaxed mental state. However, this should still be treated as an estimate rather than a perfect measurement of attention.
Exoskeleton Arm Creation
Now that the BCI system is complete, let’s work on the mechanical aspect, where we build the exoskeleton arm. The exoskeleton needs to have five controllable fingers, so I decided to thread a thick string through each finger. Later, these strings will be controlled by an MG995R positional servo motor, using a Tendon-Driven Actuation System. I started creating the robotic arm by 3D printing all the required components. This meant designing it in CAD(Fusion 360) and printing it on a printer(Adventurer 5M Pro). The arm was modified such that it included the exact measurements of my own fingers and arm.
I have attached a folder under the GitHub directory called 3D Printable Files (STL). If you have access to a 3D printer, then you can immediately print out the files; otherwise, please make sure that you have access to such a device so that you can carry out the project. Moreover, before sending it to the printer, remember to slice the file according to the printer specifications. The following images document the 3D printing process for my project.

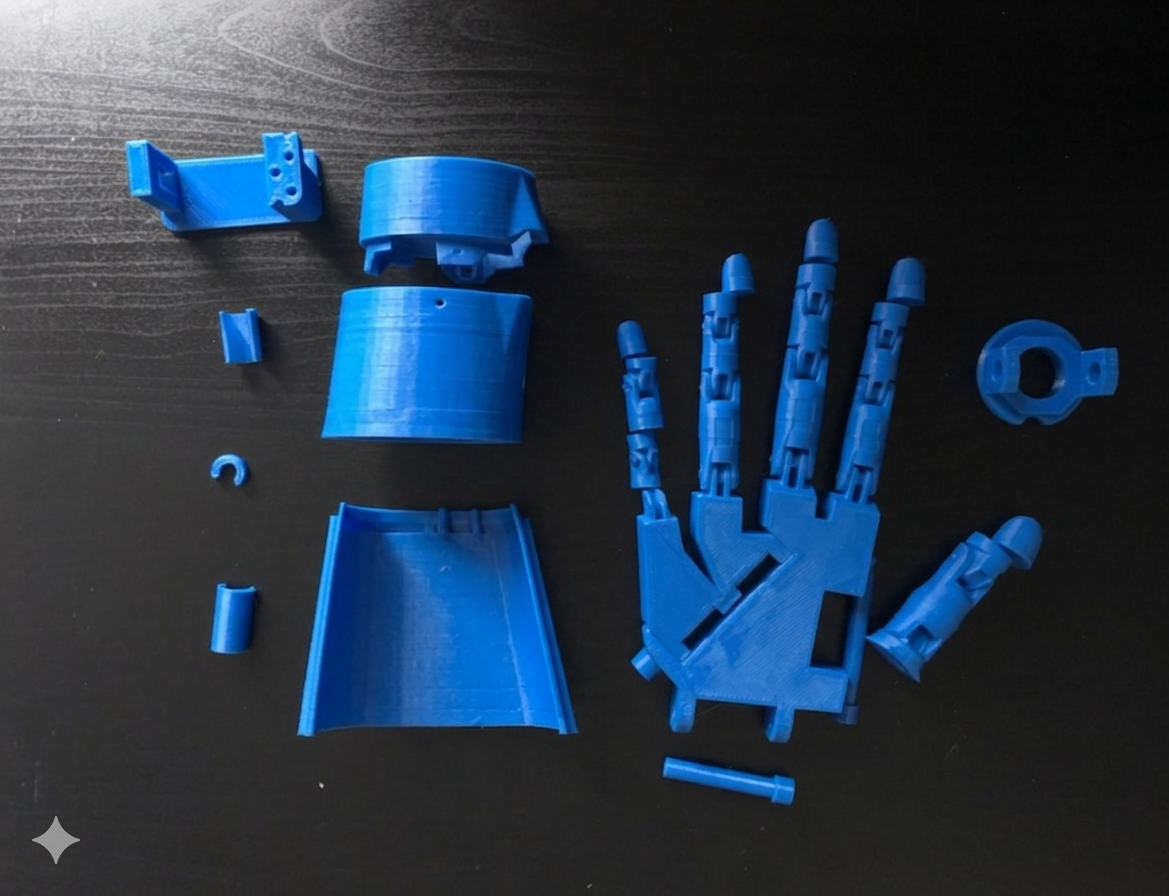
Upon completing the 3D printing aspect of the project, I was required to assemble the hand. This required a lot of UHU Adhesive Glue! After this stage, I worked on threading the strings through all the holes, making sure it was correctly placed and that it wouldn’t cause issues in the future.

After assembling the arm, I needed to focus on the hardware controls. This involved properly attaching horns to the motors, as the strings would be wrapped and screwed around them for control. This is an image of the Servo Motors all set up with the Arduino(needed for the power supply), Breadboard(easier for wiring organisation), and the Servo Tester(the main -temporary- control of the arm)!

Check out the completed Arm through this GIF and other pictures:


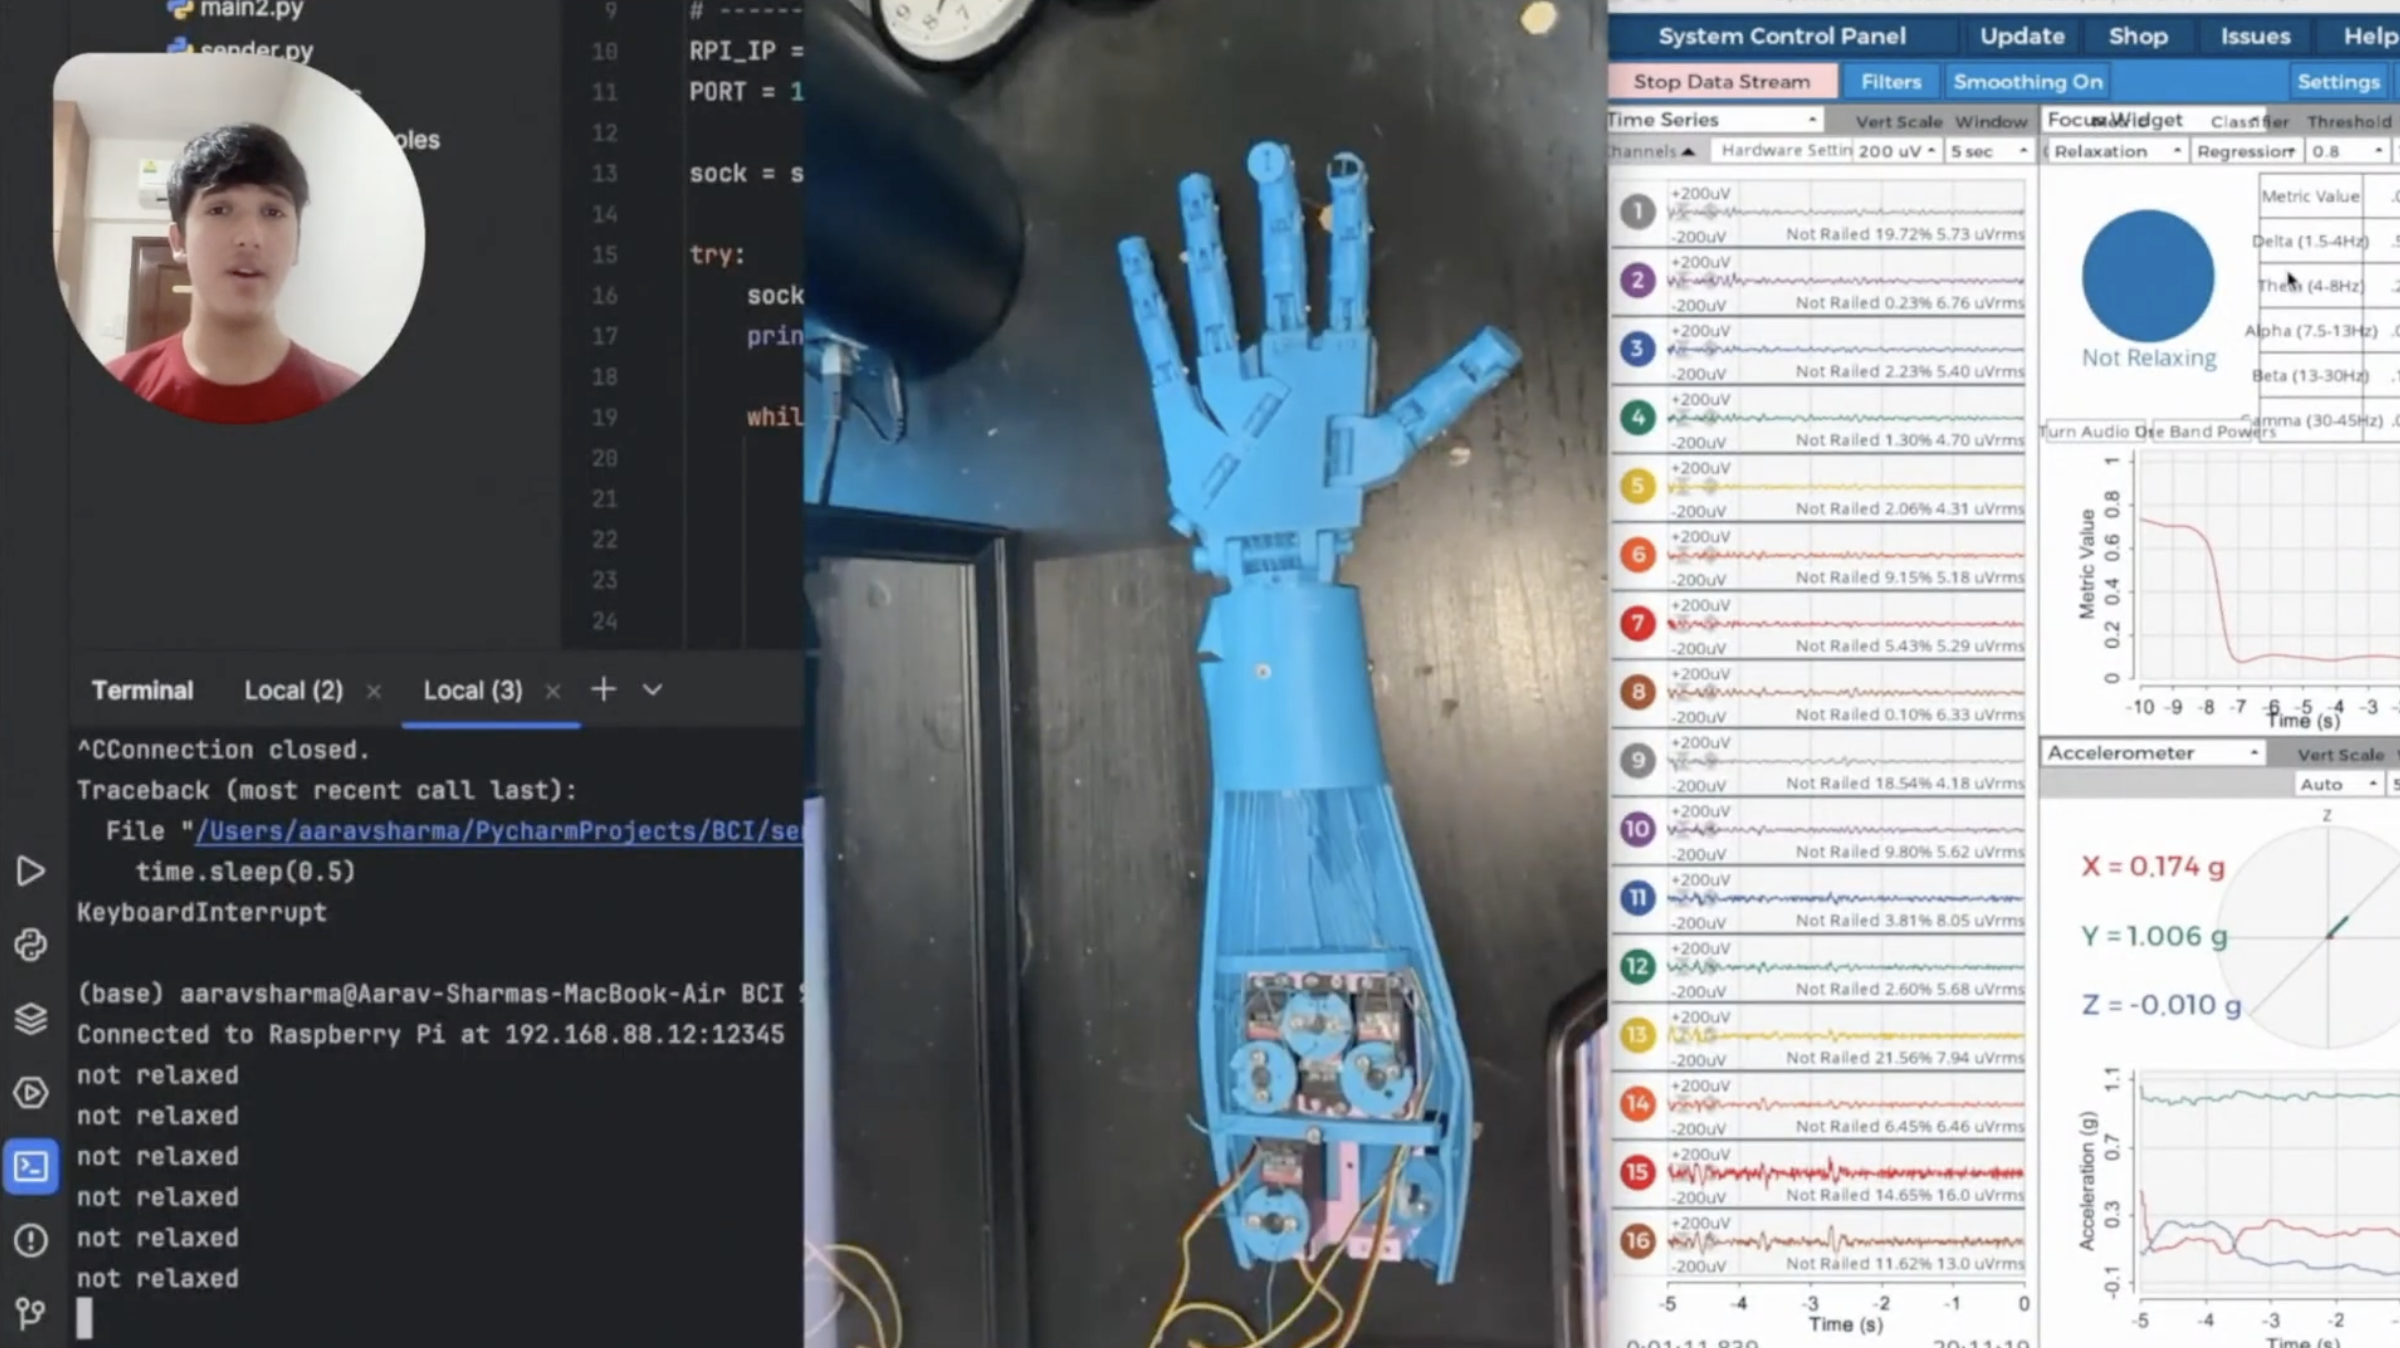
Now that both systems are completed, let’s run the script properly as one pipeline. To do so, please follow these steps:
- Open the OpenBCI GUI on your computer and keep the focus widget clearly visible, ideally in split-screen mode.
- Run the script using
python3 main.py. - The script will give you the first 3 seconds to select the OpenBCI GUI, so quickly move your cursor to the focus widget area.
- In parallel, make sure you also run the
sender.pyandreceiver.pyscript.
The second script referenced above is responsible for sending the open or close command over the network using IP communication. Since the exoskeleton arm is controlled by a Raspberry Pi, a corresponding receiving script must also be running on the Raspberry Pi. This script listens for the incoming signal and then triggers the arm movement. The code for this Raspberry Pi script is titled receiver.py in the GitHub repository.
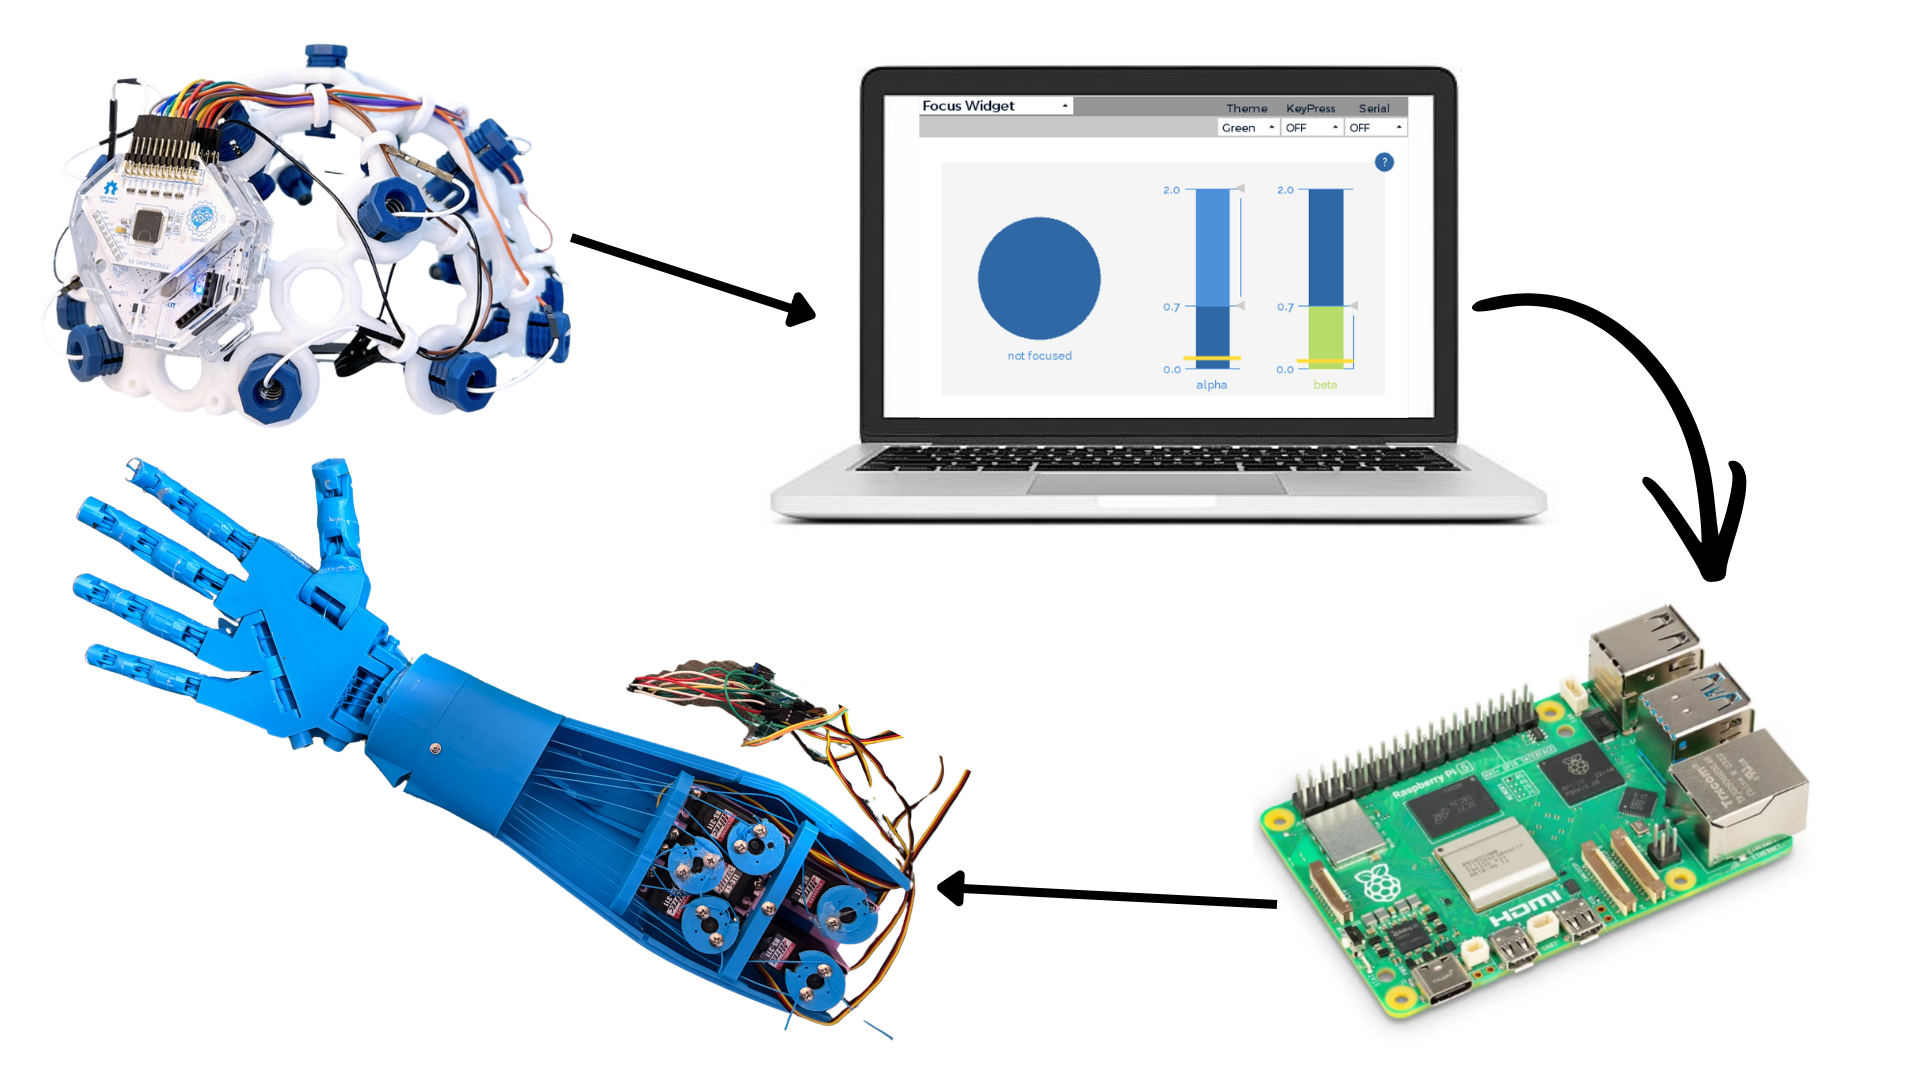
Overall, the full system works as follows:
OpenBCI headset → OpenBCI GUI focus widget → Python color-detection script → IP signal sent to Raspberry Pi → exoskeleton arm movement
Feel free to view a video attached here to see my system working in real time.
Updated Progress as of April 1st, 2025
I managed to control the Exoskeleton arm through my muscle responses using EMG(Electromyography). Check out this GIF to see the arm in action!
_________________________________________________________________________________________
Updated Progress as of Feb 5th, 2025
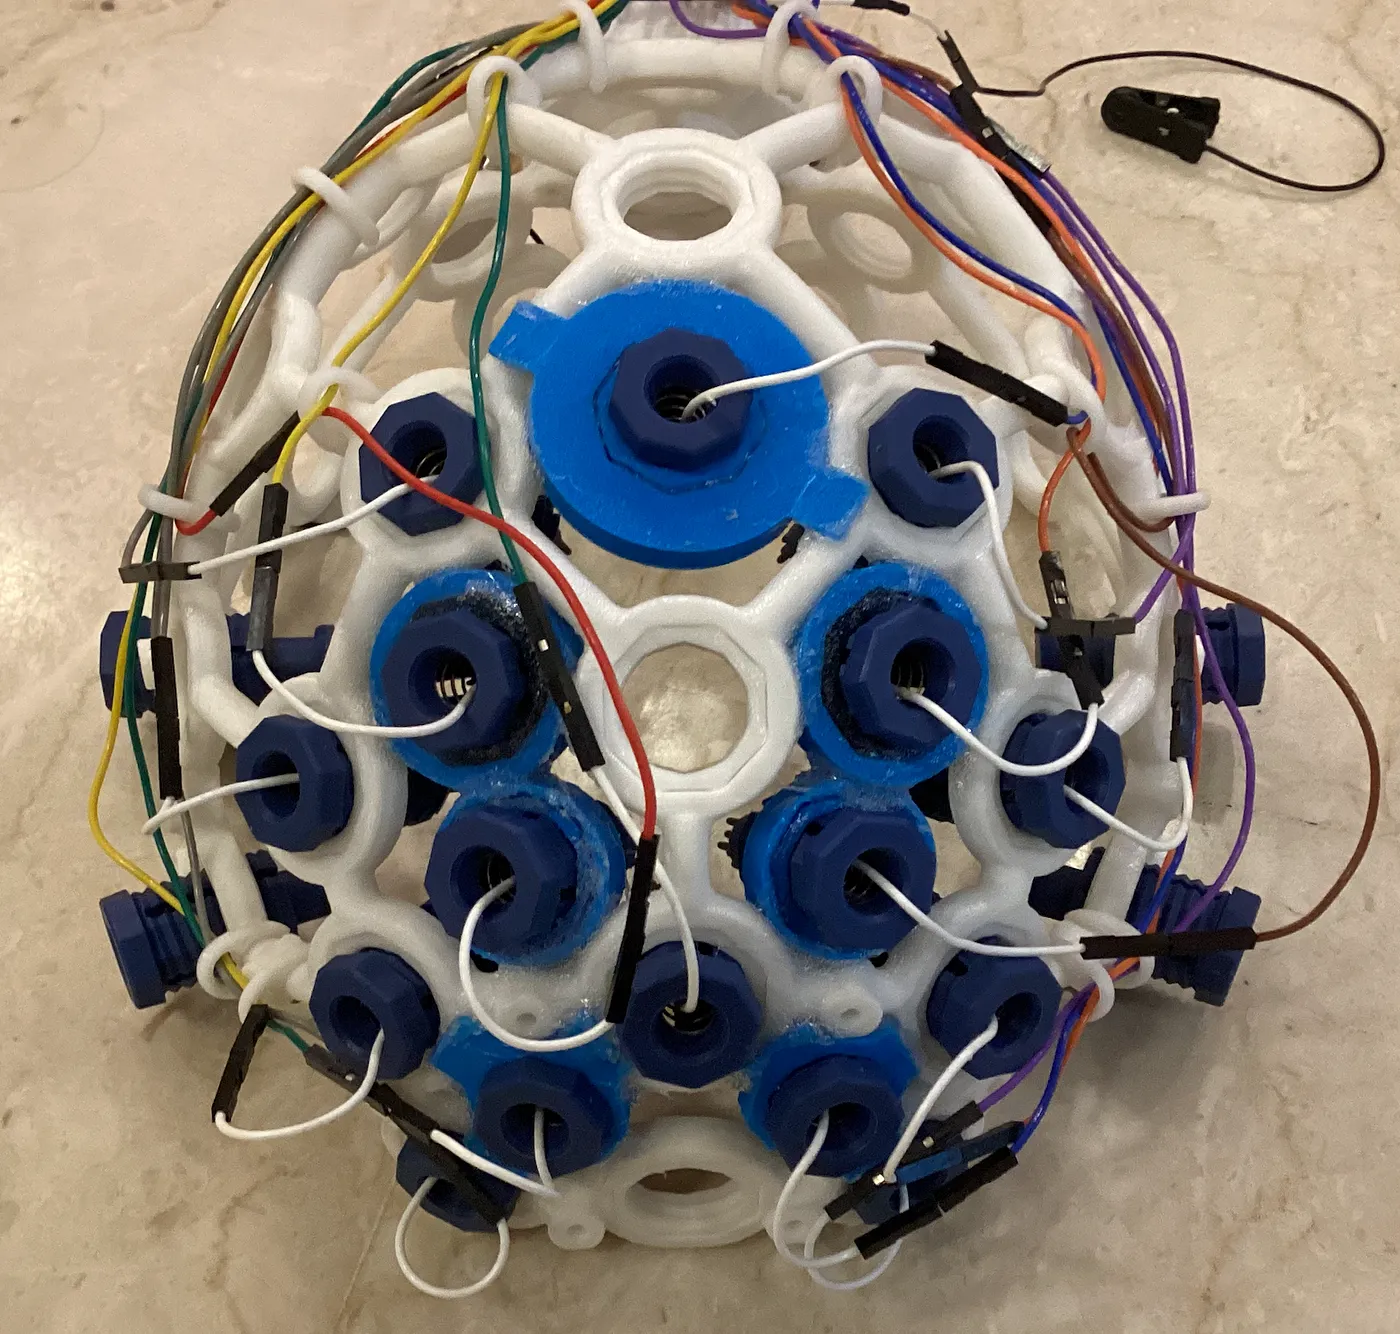
When I first received the headset, I started to modify it(since it was open source) so that all 16 electrodes were focused on either the Frontal Lobe, Motor Cortex, or Motor Strip(part of the Motor Cortex).
The electrodes are specifically at the following points in the 10-20 System: Fp1, Fp2, AF3, AF4, AFz, F3, F4, FC3, FCz, FC4, C3, C1, CZ, C2, C4, and CPz. I 3D printed these modifications so that the electrodes could fit in the gaps of the headset.
Check out an image of the headset after placing the modifications:
First, I wanted to do a small project to learn how to use the BrainFlow API with libraries like Matplotlib. I started by plotting EEG signals in Matplotlib and then set a threshold to detect eye blinks (using a simple equation: y = C, where C is the threshold value). My mini-project involved making a character jump whenever I blinked. This project excited me and helped me see the real potential of BCI technology and its practical applications. After that, I moved on to working on my main project.
Email for contact: aaravsharma23 [at] gmail [dot] com
Futuretech Foundation would be honored to collaborate on your project. Your innovative approach to addressing the challenges faced by individuals with paralysis and limited motor function demonstrates a profound commitment to improving lives. The integration of brain-computer interface (BCI) technology with the OpenBCI tools, such as the Cyton + Daisy Biosensing Board and Ultracortex Mark IV EEG Headset, holds incredible potential to redefine mobility solutions.
We are particularly impressed by your emphasis on accessibility, affordability, and adaptability, ensuring that this assistive technology can empower a broader audience. Your detailed explanation of the device’s functionality, combined with your practical application of OpenBCI’s versatile tools, highlights the feasibility and impact of your vision.
We look forward to discussing how we can support your mission through resources, expertise, or further collaboration. Together, we can make meaningful strides in enhancing the quality of life for millions.
Hi Futuretech Foundation,
Thanks for your comment and I am glad you find my work interesting. Would you like to connect so we can discuss the future goals of both of us?
Hi Aarav,
Thank you for reaching out! We would be happy to connect and discuss our future goals. In addition, we would like to invite you to our Slack workspace so we can collaborate more effectively. Please share your email address so I can send you the Slack invitation.
Looking forward to collaborating!
Best regards,
Futuretechfoundation
HI Futuretechfoundation,
Thanks for your reply!
Sounds good, my email is [email protected]
Best,
Aarav Sharma